Get 20% off orders over £50 with discount code REWIND
 01423 319041


What do you want to convert?
Back to Blogs
How To Clean VHS Heads
Sean Parle • 28 October 2026
How to Clean VHS Heads
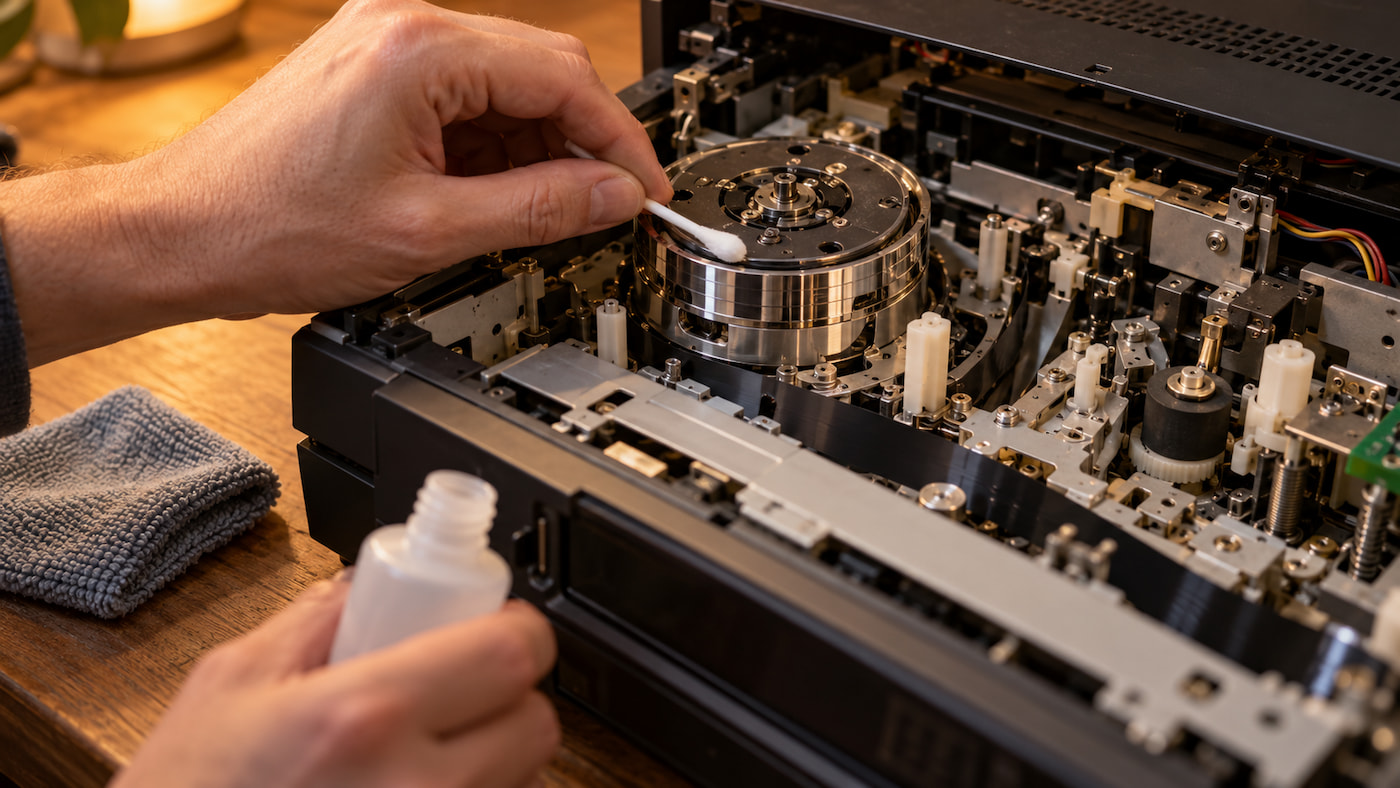
To clean VHS heads, unplug the VCR, take the lid off and dampen a chamois swab with 99% isopropyl alcohol. Hold the swab still against the shiny head drum with very light pressure, then turn the drum slowly by hand so the heads pass across the swab. Only ever move side to side, never up and down, and never use a cotton bud. Give everything a few minutes to dry before you put a tape back in.
Key points
Clean VHS heads with a chamois swab and 91% to 99% isopropyl alcohol, holding the swab still while you turn the drum by hand.
Never use cotton buds on the video heads, and never move a swab up and down, as both can bend or snap a head.
Head cleaning tapes are abrasive or risky if overused, so treat them as an emergency fix rather than a regular habit.
If the picture is still poor after a proper clean, the heads may be worn or the tape itself may be damaged or mouldy.
That's the short version. Get it wrong and you can snap a video head that's close to impossible to replace these days. Get it right and a VCR showing nothing but snow can be back to normal in ten minutes. Here's how to do it properly.
How do you know your VHS heads are dirty?
Dirty heads don't usually creep up on you. More often, the picture looks fine one minute and vanishes the next.
The classic signs are a picture that suddenly turns to snow or heavy static, a plain blue screen even though you can hear the tape turning, horizontal bands of noise rolling through the image, or colour dropping out. On many machines the sound carries on regardless, because the standard soundtrack is read by a separate, stationary head rather than the spinning video heads. Sound but no picture is a big clue.
Before you reach for the screwdriver, play a tape you know is in good condition. If that one looks fine, the problem is the first tape, not the machine. If both look awful, the heads are the likely culprit.
It's also worth knowing the difference between a clog and wear. A clog tends to hit suddenly, often halfway through a tape. Worn heads cause a slow decline over months or years, with a grainy, tired picture that no amount of cleaning will fix.
What makes VHS heads dirty in the first place?
VHS tape is a thin plastic ribbon coated in magnetic particles, held in place by a glue-like binder. As tapes age, that binder breaks down and the coating starts to shed. Those loose particles end up on the heads.
And the heads take a beating. On a PAL machine, the drum spins at 1,500 rpm with the tape pressed tightly against it. The gap in each head that actually reads the picture is microscopically small, so a speck of oxide you'd never see with the naked eye is enough to block it completely.
Dust, cigarette smoke and years in a damp loft or garage all make things worse. Mould is the real menace. If you spot white, fuzzy patches on the edges of the tape inside the cassette window, don't play it. A mouldy tape can clog a perfectly healthy VCR within seconds, and the spores can then transfer from the heads onto the next tape you put in. Our technicians clean mouldy tapes before they go anywhere near a playback machine, and in our view that's the only sensible approach.
What you'll need to clean VHS heads
You don't need much, but the right kit matters more than you'd think.
Chamois swabs are the key item. These are long sticks with a small pad of genuine chamois leather on the end. Chamois is smooth and doesn't shed fibres, which is exactly what you want near a video head. Watch out for cheap swabs sold as "chamois" that are really foam or something rougher. Our technicians have seen poor-quality swabs cause damage, so it's worth paying a little more for a proper set.
Isopropyl alcohol (IPA) at 91% or higher is the standard cleaning fluid used by repairers, and 99% is better still. The higher the percentage, the less water there is, and the faster it evaporates. Avoid "rubbing alcohol" from the chemist if it contains added oils, perfumes or other ingredients, as these can leave a residue on the heads. Glass cleaner and household sprays are a definite no.
You'll also want a screwdriver to get the lid off, a torch, some ordinary cotton buds for the other parts of the tape path (more on that below) and kitchen roll for drips.
Some enthusiasts swear by a strip of plain printer paper soaked in IPA instead of a swab, because good paper sheds very few fibres. It can work in a pinch. Honestly, though, we'd rather spend a few pounds on proper chamois swabs than experiment on a machine we can't replace.
Why you should never use cotton buds on video heads
This is the single most important rule in the whole article.
Video heads aren't flat surfaces you can wipe like a mirror. They're tiny, brittle chips that poke out from small windows around the edge of the spinning drum. A cotton bud is made of thousands of loose loops of fibre, and those loops love to catch on the edge of a head. When that happens, one careless up-and-down stroke can bend or chip the head. Even if you're lucky and nothing breaks, stray fibres can lodge in the head gap and cause the very clog you were trying to clear.
Repair forums are full of people who learned this the hard way, including one Betamax owner who bent the heads with cotton buds and found that replacing them cost far more than a pack of proper swabs. With VCRs long out of production, a replacement drum for many models is now a hunt through second-hand parts rather than a quick order. In our opinion, cotton buds near video heads are the most common way people wreck a perfectly good VCR.
Step-by-step: how to clean VHS heads by hand
Take your time with this. Rushing is how heads get broken.
Unplug the VCR from the mains. There are live parts inside, and you don't want the drum spinning under its own power while your fingers are on it.
Remove the top cover. There are usually a few screws on the back and sides. Slide the lid off and keep well away from the power supply area.
Find the head drum. It's the shiny silver cylinder sitting at a slight angle in the middle of the tape mechanism. The top half spins freely, and if you look closely with a torch you'll see small slots around its edge where the heads sit.
Dampen a chamois swab with IPA. It should be wet, not dripping. Excess liquid can run down into the mechanism.
Hold the swab flat against the drum with barely any pressure, just enough to keep it in contact. Keep the swab completely still.
Put a fingertip on the top of the drum and turn it slowly by hand, a few turns in one direction and then the other. The heads pass across the swab, and the alcohol does the work.
Never move the swab up and down. Vertical strokes are what snap heads.
Check the swab. If it's picked up brown or black residue, that's shed oxide. Repeat with a fresh swab until it comes away clean.
Leave it to dry. IPA evaporates quickly, but give it five to ten minutes to be safe before inserting a tape.
Test with a tape you don't care about. Not your wedding video. If a heavily clogged head has loosened rather than fully cleared, you want any problems to happen on something expendable.
Cleaning the rest of the tape path
Cleaning the drum and ignoring everything else is a bit like washing your face and leaving your hands filthy. The tape touches plenty of other parts on its way through the machine, and grime on any of them can end up back on the heads.
To the left of the drum (as you look from the front) you'll usually find the full erase head, a small stationary block. To the right sits the audio/control head, which reads the soundtrack and the timing signal that keeps the picture stable. You'll also see several metal guide posts, the capstan (a thin, shiny metal shaft that pulls the tape along) and the pinch roller (the rubber wheel that presses the tape against the capstan).
These parts are much tougher than the video heads, so cotton buds and IPA are fine here. Just check afterwards that no lint has been left behind. A dirty capstan can cause wobbly sound and uneven speed, and gunk building up on the guides is a common reason tapes get chewed.
The pinch roller is where opinions split. Some people say alcohol dries out rubber over time, while others have used it on the same machines for years without any trouble, and specialist rubber cleaners are also available. Our take: a quick wipe with IPA is fine, just don't soak it. If the roller looks shiny, hard or cracked, cleaning won't save it and it needs replacing.
Do VHS head cleaning tapes actually work?
They can, but they're a blunt instrument.
Head cleaning cassettes came in two types. Dry cleaners use a polyester tape coated with an abrasive powder, which patent filings for these products compare to emery cloth. Wet cleaners use a coarser, cloth-like tape that you dampen with cleaning fluid before use. TDK, for example, sold both a dry VHS cleaner (the TCL-11) and a wet one (the TCW-11). Scotch even made a cleaning cassette that displayed an on-screen message which became readable once the heads were clean, which is a rather clever idea.
The problem is that both types carry real risks. Patent documents for cleaning cassettes openly state that running one for longer than the specified cleaning time can wear away the heads and, in extreme cases, seriously damage them. Wet cleaners have their own issue: put too much fluid on, and the tape can stick to the drum and strain a weak mechanism. Some VCRs won't even play cleaning cassettes at all. One JVC owner on a repair forum found his deck refused to run both a wet and a dry cleaner, despite playing normal tapes perfectly.
In our view, a cleaning tape is an emergency fix, not a routine. If you use one, follow the instructions to the letter, run it for the shortest time stated, and let a wet one dry out fully before playing anything. A careful manual clean with a chamois swab does a better job with less risk.
How often should you clean VHS heads?
Only when you see symptoms. There's no need to clean on a schedule.
Normal VHS tape is very slightly abrasive, so ordinary playback naturally keeps the heads polished. Cleaning when nothing is wrong just adds wear and handling risk for no benefit, and our technicians point out that it's genuinely possible to over-clean a VCR and damage it.
The one exception is when you're working through a pile of old tapes, perhaps before digitising them. Old tapes are far more likely to shed, so keep a close eye on the picture and stop the moment it starts to break up. Carrying on with a clogged head can scrape the tape as well as the machine.
What if cleaning the heads doesn't fix the picture?
If the picture is still poor after a thorough clean, the heads may simply be worn out. Like car tyres, they have a limited life, and a VCR that's done thousands of hours of playback may have reached the end of the road. Worn heads give a grainy, unstable picture that cleaning won't improve.
It's not always the heads, though. Try the tracking buttons first, as a tape recorded on a different machine may need adjusting. Problems with the tape itself, such as creases, stretching, mould or a snapped section, will look bad on any machine. Perished rubber belts and idler tyres inside the VCR can also cause tapes to stall, refuse to load or get chewed.
Here's our honest opinion: if your tapes hold irreplaceable family memories, don't gamble them on a tired VCR you're not sure about. Every play on a faulty machine risks permanent damage to the tape.
At Digital Converters, we repair snapped tapes, clean mouldy tapes and reshell broken cassettes, then convert them to digital so you never have to worry about dirty heads again. We handle PAL tapes as well as NTSC and SECAM for most formats.